Saturday, April 12, 2008

Trashy Studio, But it Works, Article #5

Digital Product Photography, Lighting Blog #5

It probably is a good idea to make sure you are familiar with the lighting set ups shown in the Smith Victor diagrams in blog #4. I normally use the standard 2 light portrait type of light set up. Unless I cheat.

I shoot most of my product pictures just as if I was going to shoot a portrait. I use a main light and a fill light. The main light defines the item and the fill light, fills in the shadows. I shoot my pictures in my office. I have a work bench and a fold up table that
I use to hold the products. I have gotten a little fancier over the years by adding a pull down set of gray roll paper backgrounds. One is slightly less than 9 feet wide. I cut down a 9 foot roll background using a hand saw. That way when I unwind the roll and extend it out it will just fit between the bookcases. This lets me shoot larger items or people.

I also have a 53 inch wide roll of the same gray background paper mounted on the wall. That is the one I normally use to shoot standard or small product pictures. The workbench also doubles as my packing table where I pack up and ship each day's orders.

If I am shooting small object like the small table top light that comes with some of the shooting tents, I can also just tape a piece of gray background paper to the wall behind it. Letting it drape down over the table enough to put the product on. Then I light it using one umbrella light as the main light. This is the major light for the product. It is located to the right of the camera and slightly above the camera.
Then, usually I cheat. Instead of using a second umbrella light on the left side of the camera and level with the camera, I bounce the second light off of the white ceiling. I am lucky enough to have a white ceiling. The white ceiling is basically a very large umbrella. It diffuses the light enough that it not only fills in the shadows on the product but, it also puts light on the background behind the product.


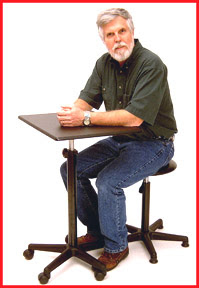
My Trashy Studio Work Area


The Finished Picture


I would get basically the same picture if I had used an actual umbrella for the second fill in light instead of cheating and bouncing the light off of the ceiling.


I set my exposures manually. Usually the lights are 250 watt bulbs. Tungsten white balance. The exposures run around 1/2 second at f8 depending on how far the lights have to be from the item to get even coverage. If I were shooting people, I would probably use 500 or 600 watt lights. That would give me a faster shutter speed and less chance of the picture being blurred because of subject movement.


If I shot a lot of portraits, I would probably invest in a set of electronic flashes. I would still shoot them manually of course. That is the only way to consistantly get good exposures and colors.

Check out these books on product lighting from Amazon

Our web page has all sorts of photo accessories.


Monday, April 7, 2008

Finally we actually get to the lighting

Blog #4


This is the 4th.th in a continuing discussion on how to get better product pictures. #1, #2, and #3 basically talked about how to set your camera. Also, there have been several books linked through amazon to help you get started on lighting.


I normally use a medium gray background. A seamless roll paper background that hangs from the ceiling. I pull down enough to cover the work table leaving the product about a foot or 2 in front of the back part of the background. I actually have 2 of them mounted on the ceiling. One is 53 inches wide and the other one is 9 feet wide. I use the wide one only when I am shoot pictures of large items like camera cases or lighting kits.


If you are shooting clothing like jeans, shirts etc. you can probably get by with the 53 inch background or smaller. You can actually cut them down to size to fit the room or area you are working in. The roll backgrounds just cut with a hand saw.


If you are shooting full length outfits like suits or dresses, you really need a wider background like the 9 foot. Again, neutral gray, white, or black are usually the best colors to choose from. Unless you have access to PhotoShop and can really take advantage of the Chroma-Key green or blue. Of course it is difficult to shoot a white blouse on a white background. Just like it is hard to shoot a black outfit on a black background. Normally I do not shoot pictures of clothing so, I do not run into the problem of gray clothing on the gray background.


Most of the products I shoot are photo related. Brackets, lighting kits, tents, etc. I usually use the 53 inch wide background because the products are fairly small. Say, 10 to 15 inches in size. Actually most of them could be shot on a small 15 or 20 inch piece of background paper.


Why are we talking about backgrounds when this is supposed to be about lighting? Because you have to have something to put the product on before you set up your lights.


I normally shoot my product pictures just like I would shoot a head and shoulders portrait picture. I use 2 lights with white umbrellas. Assuming that the camera is on a tripod and basically level with the product or just slightly higher than the item, one light, called the main light, is to the right of the camera and slightly above the camera. That throws the shadow behind and to the left of the item. The second light is level with the camera, slightly further back from the item and on the left side.


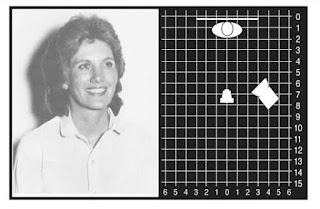
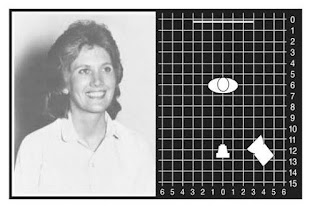
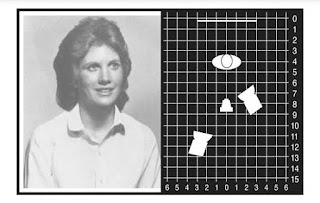
The following pictures are from Smith Victor Lighting. They are very basic. All you should be looking at is where the shadows fall due to where the light and the background is.


Notice that the shadow is very prominent to the left of the model's head. This because of only using one light and the model, or product is close to the background.


If we move the model, product further away from the background, the shadow becomes more diffused and is further to the left.


If we use a second light to fill in the subject and the subject is not close to the background, most of the shadows disapear. If you use umbrellas instead of direct lighting the shadows are even softer and less of a problem.


Basically you are creating the image 3-demensionally with the main light and filling in the shadows with the second light. The picture may look like there are not any shadows but, they are really there. If you just set each light up equally on each side 50-50 then the subject will look flat and dull.


This is a basic 2 light product or portrait set up. It should work well with clothing, people, small, medium or even large items. If you have set your camera to the right white balance, right exposure and used a tripod your pictures should look a lot better than before. Again, KIS, Keep It Simple. Only 2 lights produce only 2 shadows. They are much easier to work with than 3, 4 or more lights. That just confuses things.


Next I will talk about some special shooting problems like flatware or ceramic materials. Shiny objects. Daryl

Check out Nikon's digital cameras on Ebay.


Also eBay's Canon Digital Camera Link.


May we recommend.


Digital Product Lighting Books from Amazon

Digital Portrait Lighting Books from Amazon

Check out our web page for more digital photo studio accessories 2 Sisters Of Texas