Thursday, November 3, 2011


When using a shooting tent like the Magic Pyramid, you end up putting the product like jewelry for instance on the table and putting the tent on top of the item. If the item is small, you can use a small box or other item to raise if off of the table so that it is closer to the camera. That way you get the image size that you want to work with when you open up the file in your computer. Remember with this tent the camera is normally mounted on the top mounting bracket attached to the top opening of the pyramid tent.

You can use your regular photoflood lights to light the pyramid. Just position them so that they are about 1 to 2 feet away from the sides of the pyramid and slightly above the level of the item inside of the tent.

Friday, April 25, 2008

What is a shooting tent for? Article #6

What do you use a shooting tent for?
Article on product lighting #6

Lots of people have asked me over the years about a shooting tent so that they can get better pictures of their products for Ebay or their web page. Will a tent make it easier to get better pictures? Will it get rid of shadows? Etc. Etc.

Basically a white shooting tent is designed to help you control reflections and shadows. You still want to show your item as a 3 dimensional article so you do not want totally even light on the item. This means that the lights that are lighting the tent are at different distances from the tent.

If the item is shiny or has lots of smooth bright surfaces like tableware, vases, custom knives or articles with lots of small indentations like small models of cars or statues, you probably need to use a white photo shooting tent.

The item by being surrounded by white diffused material has a more even light. You still need to aware of the item being 3 demensional though. That means that when you set up the lights on the outside of the tent, one light is closer to the tent, (item) than the other light. Usually about 25% closer. That makes the closest light your main light while the other light is your fill light. Check out the previous articles about main and fill lights. If you just set the lights up evenly on each side, your article will have very flat lighting and not look as 3 demensional as it should.

The first picture of the custom knife was shot using a standard 2 light umbrella set up. Just as if it was a portrait. But inorder to get the correct lighting angle on the blade so that there were no reflections, the name does not show up.

The second shot is of the same knife using a soft white shooting tent. Basically the reflection off of the blade is the white tent material. This lowers the contrast and lets the name show.
Yet, there are still shadows of the knife so that it does not look too flat.

Some tents come with a front cover that has a slit or hole in it. This is to allow you to shoot through the hole and not get the reflection of the camera or the photographer in the picture. You can also use a white piece of paper or cardboard with a hole cut in it. Just hold the paper infront of the camera and shoot through the hole. The reflection of the white paper is basically the same as the reflection of the white material of the tent.

Here are a few shots of a brass stag’s head cup. It has not been polished, hence the stains and marks on the cup part. The cup is inside of a 15 inch shooting tent. On a white background. The gray background in the picture of me shooting the cup did not work out well. Please notice that it looks 3 deminsional and is not flat. The lights are directed towards the sides of the tent. The one on the left is about 50% further away from the tent than the one on the right. This gives you just a little shadow effect. Look at the bottom of the stag’s head on the one where the cup is upright. You will notice there are some shadows on the white paper. This is what gives the cup a realistic look. Not just a flat picture. Also I ended up using a larger piece of white cardboard with a hole in it. The smaller piece of paper showed too much of the edges of the tent.

Some tents come with a front cover piece with a slit in it to shoot through. This is a great idea in theory. However, I have never figured out how to move the product around inside of the tent when you are effectively sealed out. I prefer just a white piece of paper or cardboard hand held in front of the camera.


Recomended Books from Amazon to improve your product pictures


If you are getting ready to buy your shooting tent, remember that it needs to be larger than the objects that you are shooting pictures. The basic rule of thumb is that your background (in this case the width of the tent) needs to be about 50% wider than the object. So, if you are shooting something that is 3 inches wide, the background must be at least 9 inches wide. Remember that the background is behind the object and the angle of view from the camera is like a triangle.

Note the angle of view as seen from the camera's viewpoint. The closer the camera is to the subject or product, the wider the angle is and the wider your background has to be. Unless of course, you just enjoy fixing things in PhotoShop or other picture manipulation program.

Check out our eBay Store for more bargains

Saturday, April 12, 2008

Trashy Studio, But it Works, Article #5

Digital Product Photography, Lighting Blog #5

It probably is a good idea to make sure you are familiar with the lighting set ups shown in the Smith Victor diagrams in blog #4. I normally use the standard 2 light portrait type of light set up. Unless I cheat.

I shoot most of my product pictures just as if I was going to shoot a portrait. I use a main light and a fill light. The main light defines the item and the fill light, fills in the shadows. I shoot my pictures in my office. I have a work bench and a fold up table that
I use to hold the products. I have gotten a little fancier over the years by adding a pull down set of gray roll paper backgrounds. One is slightly less than 9 feet wide. I cut down a 9 foot roll background using a hand saw. That way when I unwind the roll and extend it out it will just fit between the bookcases. This lets me shoot larger items or people.

I also have a 53 inch wide roll of the same gray background paper mounted on the wall. That is the one I normally use to shoot standard or small product pictures. The workbench also doubles as my packing table where I pack up and ship each day's orders.

If I am shooting small object like the small table top light that comes with some of the shooting tents, I can also just tape a piece of gray background paper to the wall behind it. Letting it drape down over the table enough to put the product on. Then I light it using one umbrella light as the main light. This is the major light for the product. It is located to the right of the camera and slightly above the camera.
Then, usually I cheat. Instead of using a second umbrella light on the left side of the camera and level with the camera, I bounce the second light off of the white ceiling. I am lucky enough to have a white ceiling. The white ceiling is basically a very large umbrella. It diffuses the light enough that it not only fills in the shadows on the product but, it also puts light on the background behind the product.


My Trashy Studio Work Area


The Finished Picture


I would get basically the same picture if I had used an actual umbrella for the second fill in light instead of cheating and bouncing the light off of the ceiling.


I set my exposures manually. Usually the lights are 250 watt bulbs. Tungsten white balance. The exposures run around 1/2 second at f8 depending on how far the lights have to be from the item to get even coverage. If I were shooting people, I would probably use 500 or 600 watt lights. That would give me a faster shutter speed and less chance of the picture being blurred because of subject movement.


If I shot a lot of portraits, I would probably invest in a set of electronic flashes. I would still shoot them manually of course. That is the only way to consistantly get good exposures and colors.

Check out these books on product lighting from Amazon

Our web page has all sorts of photo accessories.


Monday, April 7, 2008

Finally we actually get to the lighting

Blog #4


This is the 4th.th in a continuing discussion on how to get better product pictures. #1, #2, and #3 basically talked about how to set your camera. Also, there have been several books linked through amazon to help you get started on lighting.


I normally use a medium gray background. A seamless roll paper background that hangs from the ceiling. I pull down enough to cover the work table leaving the product about a foot or 2 in front of the back part of the background. I actually have 2 of them mounted on the ceiling. One is 53 inches wide and the other one is 9 feet wide. I use the wide one only when I am shoot pictures of large items like camera cases or lighting kits.


If you are shooting clothing like jeans, shirts etc. you can probably get by with the 53 inch background or smaller. You can actually cut them down to size to fit the room or area you are working in. The roll backgrounds just cut with a hand saw.


If you are shooting full length outfits like suits or dresses, you really need a wider background like the 9 foot. Again, neutral gray, white, or black are usually the best colors to choose from. Unless you have access to PhotoShop and can really take advantage of the Chroma-Key green or blue. Of course it is difficult to shoot a white blouse on a white background. Just like it is hard to shoot a black outfit on a black background. Normally I do not shoot pictures of clothing so, I do not run into the problem of gray clothing on the gray background.


Most of the products I shoot are photo related. Brackets, lighting kits, tents, etc. I usually use the 53 inch wide background because the products are fairly small. Say, 10 to 15 inches in size. Actually most of them could be shot on a small 15 or 20 inch piece of background paper.


Why are we talking about backgrounds when this is supposed to be about lighting? Because you have to have something to put the product on before you set up your lights.


I normally shoot my product pictures just like I would shoot a head and shoulders portrait picture. I use 2 lights with white umbrellas. Assuming that the camera is on a tripod and basically level with the product or just slightly higher than the item, one light, called the main light, is to the right of the camera and slightly above the camera. That throws the shadow behind and to the left of the item. The second light is level with the camera, slightly further back from the item and on the left side.


The following pictures are from Smith Victor Lighting. They are very basic. All you should be looking at is where the shadows fall due to where the light and the background is.
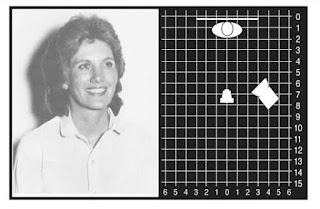


Notice that the shadow is very prominent to the left of the model's head. This because of only using one light and the model, or product is close to the background.
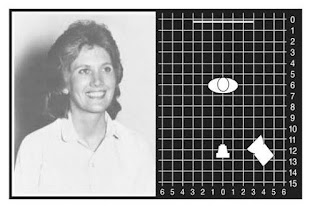


If we move the model, product further away from the background, the shadow becomes more diffused and is further to the left.
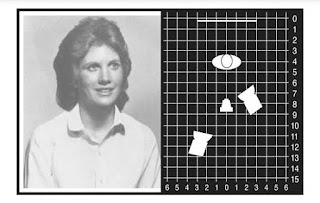


If we use a second light to fill in the subject and the subject is not close to the background, most of the shadows disapear. If you use umbrellas instead of direct lighting the shadows are even softer and less of a problem.


Basically you are creating the image 3-demensionally with the main light and filling in the shadows with the second light. The picture may look like there are not any shadows but, they are really there. If you just set each light up equally on each side 50-50 then the subject will look flat and dull.


This is a basic 2 light product or portrait set up. It should work well with clothing, people, small, medium or even large items. If you have set your camera to the right white balance, right exposure and used a tripod your pictures should look a lot better than before. Again, KIS, Keep It Simple. Only 2 lights produce only 2 shadows. They are much easier to work with than 3, 4 or more lights. That just confuses things.


Next I will talk about some special shooting problems like flatware or ceramic materials. Shiny objects. Daryl

Check out Nikon's digital cameras on Ebay.


Also eBay's Canon Digital Camera Link.


May we recommend.


Digital Product Lighting Books from Amazon

Digital Portrait Lighting Books from Amazon

Check out our web page for more digital photo studio accessories 2 Sisters Of Texas

Friday, April 4, 2008

More on manual exposure #3

Digital Product Photography. Remember, we are trying to learn how to use our digital camera in the manual mode. Not the automatic mode. Once you have everything set on your camera to get good product pictures, you can basically start shooting in volume. The most common thing that you will change is if you have to shoot something of a different size. That probably requires you to move your camera and your lights. If you move you lights closer or further away from the item you are shooting, you will probably need to change the shutter speed. If you move farther away from the item, you will probably have to increase the shutter speed on the camera. The further the lights are from the subject, the less light there is. If you move them closer, you will probably have to increase the shutter speed because you now will have more light density on the item.

Remember the basics for the manual mode.
Set the White Balance
Set the ISO in manual around 200
Set the f-stop, iris opening
Set the shutter speed
Use a tripod


Setting the white balance locks in the correct colors of your product making it easier to fix the final results in your picture control program. Setting the f-stop locks in the iris opening of the lens. Now all you have to do is determine the proper shutter speed. I normally do this by trial and error. If you have a manual metering mode you can us that to get close but, if you are shooting on a light background it probably will not give you the right exposure.

Usually I will shoot about 6 shots starting at 1 second and progressing through the shutter speeds until I get to about 1/10th of a second. I use 250 watts lights bounced off of umbrellas so most of the time, my shutter speed will end up around 1/2 second.

After you have shot the test pictures and taken notes as to which picture was shot at what shutter speed, you will want to open them up in your computer. You can't use the monitor on the back of your camera. It is too small and does not show enough detail.

When you get the pictures opened up on you computer in whatever picture control program you normally use, pick the one that has the best overall density. You do want to avoid any picture that is borderline too light. Digital has very little leeway for overexposure. If you are a little underexposed, a little too dark, that is alright. You can usually increase the contrast a little without messing up the picture. If you are exactly on the correct exposure or slightly overexposed and you want to increase the contrast you will notice that you loose the highlights in the picture. In other words the light areas wash out.

At a local eBay sellers meeting where I was helping people learn how to use their digital cameras, I came across several cameras that did not have a manual mode. Most of the Olympus and Kodak digital cameras did not have this option. Inorder for you to make consistant color pictures for your web page or eBay pages, you MUST have the ability to set f-stops, shutters speeds, ISO, and White Balance.

You can check the Nikon Digital Camera link on eBay below. Just remember, you should have a camera that has full manual operation. You need f-stops and shutter speeds.


Also eBay's Canon Digital Camera Link.


The size of the camera's sensor chip is probably not as critical as you would think. Unless you are doing jewelry where you need as much detail in the original picture as posible all your really need is a 3 megapixel camera or larger. I shoot everything with a older Minolta 3MP model Dimage Z10 camera.


May we recommend.


Tuesday, April 1, 2008

Manual exposure modes article #2

It is advisable to read these articles in date sequence. This is article #2.

In the previous article I talked about automatic versus manual exposure. Please keep in mind that setting the camera to a manual exposure system gives you repeatability in your product pictures. Also, some cameras do not have a manual mode. Most of the Nikon and Canon point and shoot type of digital cameras do have a full manual mode. I have found though that the Olympus and Kodak cameras do not have this ability. If you are going to be using your camera specifically to shoot product pictures for your web site or eBay, you will get better more repeatable results if the camera has the ability to set the exposure manually.

Digital Product Lighting Books from Amazon


Digital Portrait Lighting Books from Amazon

Check out our web page for more digital photo studio accessories 2 Sisters Of Texas


I get lots of questions about how do I set the camera manually. Well, big problem. Each camera brand and sometimes between models of the same brand the systems are different. Read your instruction book It should tell you how to do the following.
#1 Turn off the flash.
#2 Set the ISO (film speed) to a manual mode, probably around 200.
#3 Set the shutter speed and the f-stop.

Why do all of this you ask? Because most digital cameras are designed to take snapshots. When you take a snapshot probably 99% of the time if you were to add up all of the colors in the picture, reds, blues, grays, greens, etc. you would get a neutral gray color. The same is usually true about the densities in your average snapshot. If you added up all of the light, dark, darker, and black areas in a snap shot it usually comes out a neutral gray. So, this concept is programed into the camera. You have to turn this system off because when you are shooting product pictures you very seldom have a picture full of different items, people, backgrounds etc. You normally have one product and one background.
Let's say you are shooting blue jeans on a white background. You do not have any reds in the picture. Just blue and white. So, the camera will try to add red to the picture to get back to a neutral gray. When you adjust the picture in whatever picture control program you are using to get the blue jeans to look right, the background usually ends up pink. This because the camera took red out of the picture. In order for you to get the blue jeans to look right, you had to add red back into the picture. Just pretend that the blue rectangle in the white is your pair of blue jeans. Did you get something like this?


When you started out with this.

Good old AutoMatic White Balance at work.

Ok, let's pretend that you are shooting a red blouse on a white background.


Did you end up with something like this. A blue or cyan background.


Again, the auto white balance is trying to fix your picture. It is trying to add up all of the colors and get gray. You have to turn that system off. You do that by setting the white balance. You can usually just set the camera for the type of lights you are using like the tungsten setting for hot type of tungsten or quartz halogen lights or if you are using 5000K daylight fluorescent bulbs then you can set it at the daylight setting. Best of all is to do a custom white balance if that option is available on your camera. That way when you shoot items on a white background it stays white and the colors of the products are still correct. Like the jewelry in the picture below.


More to come.


Monday, March 31, 2008

How to use your camera

First of all you will need to learn how to use the camera in its manual mode. Why? Because in the auto modes it try’s to fix everything for you. Basically your camera is designed to make good consistent snapshots. One of the things that photo technicians discovered over the years was that if you took all of the colors in a regular snapshot type of picture and added them up you would almost always get a neutral gray. So, when the electronic manufactures started making digital cameras they incorporated this idea into how the camera’s chip sees the colors in a picture. The chip is more like your eye than like film. Film had to be made to work with certain types of light. I am sure everyone remembers seeing pictures taken with film cameras inside when the flash did not go off. Remember those orange or yellow pictures? That’s because the film was manufactured to give correct color when used in daylight or flash, not room light. The light inside your house is much more yellow orange in color.

Your eye however does not see this light as orange. Why, because sort of like the chip in your camera, your eye and brain can adjust the perceived color that you see. The digital camera can do the same thing. In the auto mode it changes the recorded image so that the orange is no longer visible in the picture if you are shooting snapshots. Remember, everything adds up to gray if the camera is in the auto mode. Any auto mode.

You have to turn off all of the automatic modes. When you do this, you can set your product picture up and switch out the products without having to change anything on the camera.

So,
· Turn off the flash
· Set the ISO to a manual setting, usually around 200 ISO
· Turn off the automatic exposure system by setting the camera on Manual
· Set the exposure manually. Usually if you are using photofloods in the 250 watt range, the camera will be set around f8 and ½ second exposure time. (You will find out later what an f-stop like f8 is. The ½ second is just the length of time that the camera’s sensor sees the light.)
· Set the White Balance on the camera to match the lighting system you are using.
· USE A TRIPOD!!!


Do you want to learn more? Keep reading this blog.
Thanks, Daryl DeVault

Need Replacement Bulbs
for Your Studio Lights


Check out these helpful books on product lighting.


Ebay Photography The Smart Way: Creating Great Product Pictures That Will Attract Higher Bids And Sell Your Items Faster (Ebay Photography the Smart Way)

Light: Science and Magic: An Introduction to Photographic Lighting (Paperback)

Exposure and Lighting for Digital Photographers Only